Showing posts with label DIY. Show all posts

Sunday, 22 April 2012

DIY: Peter pan style lace collar

Hey everyone! Here is the DIY I promised :) I was lazy so I couldn't be bothered to do the cutting twice as much fabric, sewing together, turn inside out type thing so it's an easy project to do even without a sewing machine :)

I cut out a rough template for one side of the collar


Pin it down onto the fabric type of your choice (mine was some white silky fabric scrap in my mum's scrap bin that I scavenge around) and cut around it


You get a shape like this


Pin it down onto some more fabric and then cut out the second bit of the collar


This is both pieces together (not sewn yet) with the stencil above


I want clean edges (You'll later see why I didn't pin and sew down the round edges bit as well) so I pinned the seam allowance bit I gave myself to sew


The edge will now look neat and won't fray


Get some ribbon (this is what you will tie around your neck) I chose white


Now sew a piece of white ribbon on the edge of the half-moon shape. Do these same steps for the other half-moon shape


The pieces together (not sewn together yet) after you have sewed down the top and the ribbon (one piece of my ribbon was 40cm I think? I kinda measured it out roughly on how long a piece I think I would need)


I wanted to sew lace on the curvy bit so I snuffed around for some lace (my mum has so many types)


I chose this type :3


A close-up of the lace type


Cut out a piece of lace, pin it to the curved bit and sew down. Cut off the excess


After. Do the same for the other half-moon piece and put both pieces together


Overlap them slightly in the middle, then sew down


I rifled through my buttons box for a button to attach in the middle of the two pieces. Find a button you liked and hand sew it on :)


The first button I chose, then I decided to cut it off and sew another one on


The real finished product. Tada!

Very fun project to do :) And the ribbon means you can wear it higher up your neck, or lower depending on what you like :)

Sorry this project is a bit late, it's cos I was watching 'The Voice' :D Such a good show! My FAVOURITE so far is Lakyn Heperi. He sang one of my favourite songs too at his audition: MGMT-Kids.

Love: Michelle

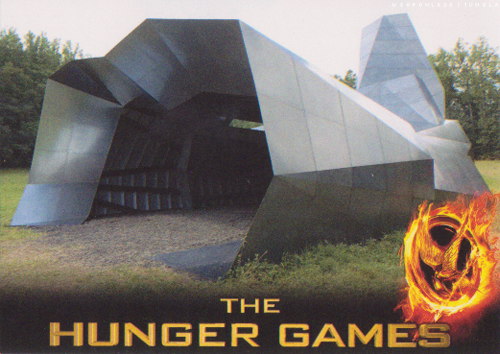
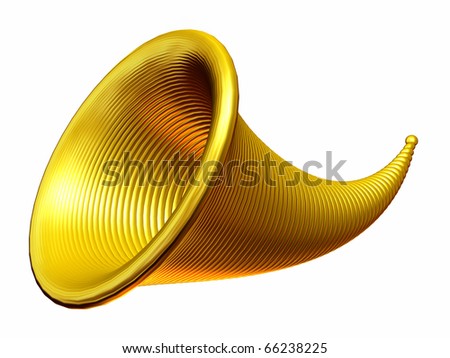
P.S. I'm in Huger Games fever atm! Watched the movie today with my sis at Castle Towers :) So faithful to the book!! I was nearly in tears when Cato died :( He (and Clove) were my favourtie characters in the first book. The only thing I did not like about the movie was the portrayal of teh Cornucopia! In the book it's golden and horn-shaped, in the movie it looked like a grey porygon (for non-Pokemon fans, this is a porygon).

This was the Cornucopia in the movie


This is what an actual cornucopia looks like (and what I was expecting it to look like from the description in the book)


Lol but that was a really small complaint :) I can't wait to read Mockingjay which AM is so kindly lending me tomorrow :)

P.P.S. These are some stuff my sis and I made yesterday from broken necklaces. I think I will put a DIY on these projects too so here is a sneak peek!


A chain collar necklace-only tool needed is pliers :) And several broken/old necklaces


Some delicate chain rings of several sizes (old/broken necklaces needed but also a sewing pin and thread)


Sunday, 12 February 2012

Let them eat cake

Who doesn't like cake? There's so many types, and that yum frosting and cream...uh oh! What about people who are lactose intolerant? :O

My sister hs a friend who turned 20 yesterday, and she LOVES cake. Except she's lactose intolerant. And she also loves candy and chocolate. So my sister tried to think of a solution around it....a cake that would taste nice and still look good that would have candy on it but no frosting or cream....hmmm

Well here it is!

First, make a basic kind of cake, sponge, chocolate, etc. This one is a Vanilla sugar tea cake


Electric mixer, mix until smooth etc Okay now most people use ovens, but I always use a rice cooker. The cake ALWAYS turns out perfect with no burnt bits, perfectly shaped etc :D You guys should totally try it btw (of course if I was making a cheesecake or a torte I'd use an oven etc but in this case I'm talking about tea cakes, basic sponges, family chocolate cakes etc then rice-cooker away hehe)

Tada! This cake is DONE! :)

Okay since it's a tea cake my sister put cinnamon and sugar over the top.


Woohoo cooking part is done! Now time to decorate our cakey :)

First, melt some chocolate (we're going to use this as glue)

Notice the tim tams on the paper towel? We used two packs for this cake


Now 'glue' the tim tams to the side of the cake. We used two different flavours; caramel and original.
Continue glueing until you've reached all around the cake.

Now, pour in some colourful sweets into the cake and tim tam barrier. Make sure your cake is shorter than the length of the tim tams btw so then you can create a little area where your colourful sweets can sit properly. We used crispy m and ms. Yum! You can also use skittles etc :) Likewise, substitute tim tams for kit kats, other kinds of chocolate etc :)

Notice how the cake is off centre of the red dish? It's cos we wanted to put more sweets at the front but you can do it however you like :)


Tie a pretty bow around the tim tams for decoration and also to keep everything in place and sturdy :D Also cos my dad wanted to eat some tim tams and he tried to steal one so the ribbon also = safety precaution against dads HAHA. He stole lots of m and ms off the top of the cake though LOL

Okay can you see the little mini marshmallows? We had pink, white, yellow and green ones and deicded to make a pattern. Again, use the chocolate as glue.


Continue gluing marshmallows all around the tim tams. Yay! Gluing in a pattern makes it look even cuter :D


My sis and I made some sort of production line HAHA I put the chocolate glue on the marshmallows and she stuck them on :)

Okay once you're done with the marshmallows decorate the empty space at the front with moar candy! Yay!

 TADA! I like this picture. Natural light from the window :) We used Hershey's kisses and Reese's cups for the front bits. A friend got them for us from Costco :)

Anyhow hope you enjoyed the walkthrough of this cakey, may the rest of your Sunday be wonderful today and hoping to see you all at the SWIMMING CARNIVAL tomorrow! Woo! Last swimming carnival ever! :)

Love: Michelle

Friday, 10 February 2012

DIY: How to make a cheerleader costume from the show 'Daria'

Okay I was supposed to upload this tutorial much earlier than this but so many pics to upload zzz couldn't be bothered but then I was like eh I'd better do it sooner than later or else I wouldn't ever end up doing it.

I bought 50cm of yellow fabric at Lincraft, it was very thin (it's folded over itself several times so it looks quite opage but in reality fabric was very very thin and see-through) so the first thing I did was:

Get some white fabric of my mums (she has a tonne lying around lol) and fully LINE the fabric so the blue of the skirt wouldn't peek through if I had kept it unlined. You'll see the difference later.

I found some yellow thread (always match your thread to the fabric colour, DON'T FORGET to change the bobbin colour thread too)

This thread matched perfectly. I took two spools in case one ran out during my sewing since I was making two costumes instead of only one (one for me, one for RH)

If you look closely, you can see pins in the fabric. Pin both white and yellow together and sew all the edges. In this case you can see excess white at the bottom, it's because the white material I had wasn't exactly to size of the yellow so i pinned down what I could, sewed down all I could then cut off excess white fabric.


Here you can see the distinct difference between lined and unlined on the blue fabric of the skirt. If you fabric is too thin, this is a very important step.

The inside of the fabric is now lined and the yellow colour is more opaque! Yay!

Now get your blue skirt (I used my old primary school skirts for sports; luckily I had two of them)

Measure the waistband to see how much fabric you need for the waist part
(The skirt is not actually this navy, the photo above was with flash, this had strange lighting)


Cut out the length of the band that you measured and sew around the edges.


Pin down and sew sew sew around the whole rectangle! :)


Repeat for the other skirt. Voila band is now on! Cut off fraying ends and cover edges in clear nail polish to harden up edge and prevent further fraying. Also gives a nice, glossy look and keeps it stiff :) (THIS. TOOK. YEARS)

Time to measure and cut out parts for the rectangles of yellow fabric that go DOWN the skirt making it look pleated


Sew around them like I did with the waistband before, and then cut off  fraying parts and cover in nail polish again. All in all I had to make 14 bands (not including the waist ones) for both skirts, 7 for each.


Space the rectangles on the skirt evenly (I left 5cm of blue fabric between each), pin down and sew


Note the space I left between each one. I know I said I made 7 for each skirt, and there are only 6 rectangles in the picture, it's cos the last rectangle is off screen somewhere haha


I have pinned all of them down and now it's time to sew sew sew!


These are both of the finished skirts! I layered one on the other in this pic in case you guys can't tell it's two different skirts :)


I bought two shirts as bases for the tops of the costumes. I got them in different colours so they would match the colour of the skirts better (the skirts are a little different in colour, one is a bit light, the other is more navy)


Measure around the collar and around the cuffs because yellow fabric is going to go around here


Mark with a pencil and cut

At this point it's very important to change your thread to the colour your shirt is, in this case, blue. Change your bobbin too. If you kept everything yellow, any mishaps you did would show as glaring yellow thread on the outside of the shirt. Besides, using blue means the finished product looks neater, the stitches are invisible etc


Notice the thread change?

Anyway, when I cut out my yellow rectangles  I cut out DOUBLE the width of what I actually needed because I was going to FOLD IN HALF the yellow rectangle before sewing it to the edge of the collar and sleeves. This was because it was going to eb directly touching our skin, I wanted it to feel comfy with no touch edge or fraying :)


This is the inside of the shirt with all the yellow rectangles FOLDED DOWN already, SEWED ALONG THAT FOLD and then pinned to the inside of the shirt.

This part was VERY difficult (REMEMBER THE SHIRT HAS TO BE INSIDE OUT):

When sewing, be VERY careful not to SEW THE EDGES OF THE SLEEVE TOGETHER!! When you press the presserfoot down, MAKE SURE, the other side of the sleeve ISN'T IN LINE WITH IT or else you'll end up sewing both sides of the sleeve together and then ofc you can't put your arm through anymore haha


Sew the tops over the collars :) Notice the edge of the sleeve is smooth, no cut parts/fraying things? It's cos I folded the fabric in half before attaching the whole cuff :D Now it's comfy and looks better too!

When you've finished sewing, cut off stray ends and again, coat edges with nail polish. Note: This wasn't really necessary because it was only the INSIDE of the shirts (and obvs you can't see that when you're wearing it) but I'm a perfectionist and decided to do it anyway.


Both finished shirts :)


I had a bit of leftover fabric so I decided to make two ribbons for our hair:

I measured around my head and added about 5-7cm onto that.


And then I sewed all around the thin strips of fabric and covered ALL the edges in MORE nail polish (again, not necessary in this case but I'm a perfectionist HAHA)


More and more sewing....zzzz

Anyway THEN WE ARE DONE!!! WOOHOO! It took me ALL off teh weekend before muck-up to finish 2 costumes (the worst part was when I finished one thing and felt so proud then I was like NOES gotta do it ALL over again for another costume :( ) But yes, I am immensely proud HAHA and my sewing skills got exponentially better after this project. May I just say, advice: Before you start sewing take at least a couple of days (I took a week) to really really visualize what you want it to look like, what EACH step should be, even draw sketches or else if you begin sewing without a plan you're going to get lost pretty soon.

Project length: Defintiely 8+ hours, not sure exact timing. I actually got a wrist sprain for a day cos of sewing for so long in all the same time period HAHA I didn;t really give myself a break because my mum needs to use the sewing machine most days and if I got it done quickly I wouldn't get in her way when she was working :D

Hope these tips helped for any future sewing plans you guys might have!

Love: Michelle

P.S. if you want more pics on how the final product looks, feel free to look on my facebook, I have an album of muck-up photos :D